
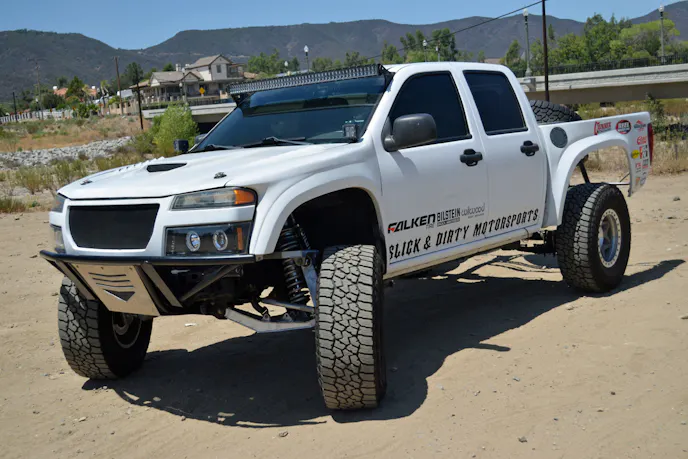
There comes a time when one’s project vehicle must go up a notch. The time comes when the vehicle needs to be built for fun instead of remaining a road warrior. For us, that was the case with Project Storm Trooper, our 2005 GMC Canyon prerunner project.
We recently had Currie Enterprises build an F9 housing for the truck, but for this install, it was more than just a direct swap. With the help of J.E. Reel, Bilstein, and Shock Security we were able to get the rear of the truck dialed in and ready for the desert.
Our shocks were going to be relocated to outside the frame rails to accommodate a fuel cell and storage options. This little change would create a complete transformation of the back half of our truck, as there would be no turning back.

Getting The Axle Under The Truck
With the bed of the truck off the vehicle, we were able to see what we were working with. Every bracket that held the bed would be removed to make sure we had a clean frame. A little work with the plasma torch and grinder gave us a blank slate to start the cage when it came time.
What We're Working With
- Currie F9 housing
- Bilstein M9200 four-tube bypass shocks
- J.E. Reel driveshaft
- Shock Security locks
- Building a custom cage
- Cycling rear suspension for shock mounts
Getting the factory axle out was something that did not faze us, as we had it out when we mocked up the Currie housing. The only difference was we were doing it in a driveway. A jack and furniture dolly come in handy when it comes to moving heavy parts.
We did not need to remove any part of the rear leaf springs when removing the factory axle, but when it came time for the Currie axle, we did have to remove the front bolt to allow the leaves to fall and the axle to slide in.
Some ratchet straps on the housing connected to the frame allowed us to lift the housing and reconnect the leaf springs. This wouldn’t be the only time the leafs would be touched during the install.


With the axle under the truck, we started to bend tubing with our JD Squared bender to get the rough design for the cage done. We spent countless hours on the internet looking at examples of what other people had done. We wanted to do something that would be sleek, stay under the bedsides, and have a rear storage area.

When it comes time to design a cage remember that triangles are your best friend. We used 1.75-inch, .120 wall DOM tubing for the entire cage. The more supports the better, knowing that we would eventually tie into the cab cage was also taken into consideration.

The thickest part of the whole cage was creating the rear section that would allow us to store tools, our jack, and anything else we wanted to take with us. This “trunk” would also hold our spare 35-inch tire. The tubing was bent to create the swinging door. Everything was tacked into place. We made sure everything worked before being welded.


If you know something is going to need to be removed for service, there needs to be a way to get it out. Nothing is worse then when it comes time to pull something out and other things need to get cut out.


Tube by tube, the cage came together. When the structure of the cage was complete, we would be able to mock up our shock mounts and get them welded to the cage as well.

Softening The Ride
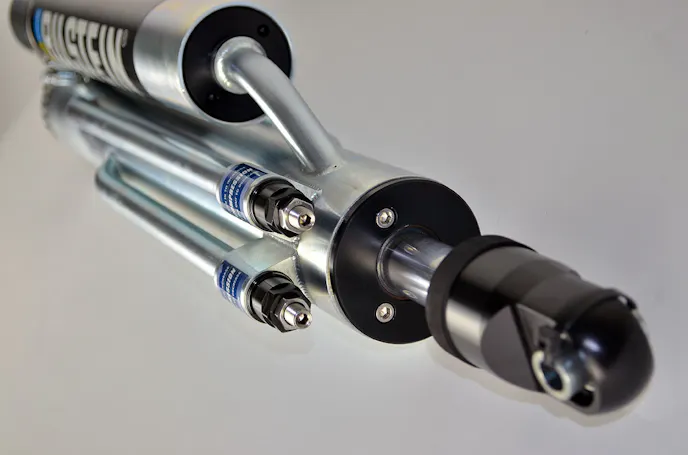
The rear of our truck would need to be able to keep up with the front of the truck in the dirt. For this, we went with Bilstein’s all-new M9200 series 70mm four-tube bypass shock. The shock would offer us a 16-inch stroke.


“The shocks feature a 60mm piggyback or remote reservoir,” Shane Casad of Bilstein explained. “They have a case hardened, centerless ground piston rod, and billet aluminum components. In addition to being owner rebuildable, they use a three-stage high-temp seal and red synthetic high-temp racing oil.”


For people not familiar with bypass shocks they may look like a work of art which they are. “The M9200 shock is position-sensitive and adjustable,” Casad explained. “It offers six zones of damping control and four external adjusters: two rebound and two compression.” The shocks also feature 1.125-inch wide shafts.
The front of our truck cycles 18 inches of wheel travel. The rear of the truck would need to match this. You may be thinking that there is no way that you can get 18 inches of wheel travel with a 16-inch stroke shock, but there is a way to get it to work.
With the shock perpendicular to the axle, the shock runs at a 1:1 ratio. You get one inch of wheel travel per inch of shock stroke. But when you angle the shock, you can change the ratio and get more wheel travel per inch of shock travel.
To figure out where your shock mount needs to be, the rear suspension needs to be cycled. The rear leaf pack needs to be disassembled to allow it to be compressed as well as extended. A piece of wood needs to be placed in a location where you can trace the shock arc.


There will be two arcs drawn: one with the suspension at full droop, and one with the suspension fully compressed, or at full bump. This needs to be done correctly to make sure it works together and nothing binds.
With our arcs drawn, we were able to get the location where the shock needed to sit. From this, we were able to draw and cut a shock tab on our plasma table. Once completed, we welded the tabs to the cage, braced them, and installed the shocks.

Protecting Our Investment
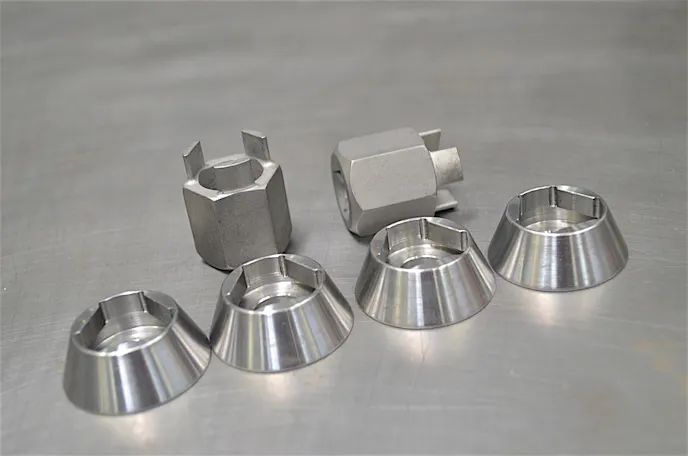
People work hard for the parts that they put on their vehicle, but in a split second, they can be gone forever by a low-life thief. Demetrio Flores at Shock Security created a product that would allow him to protect his shocks as well as others.


Knowing that my investment and hard-earned money could be gone in less than five minutes did not sit well. – Demetrio Flores, Shock Security“The idea came from a combination of things,” Flores explained. “Living in an apartment with only street parking and exposed three-inch bypasses in the bed of my truck did not put me at ease.”
“While looking for a solution in various forums, I found many cases of stolen shocks all over the country,” he continued. “Thefts happening in people’s driveways to parking lots in hotels, but still no real solution. Shocks aren’t cheap and our whole hobby revolves around them working properly: countless hours of tuning and placement.”
The ability to create a product that not only looks good, but performs the task at hand can be difficult. “The design took about a year of on and off work and after shelving the idea several times, I finally came up with the final design,” Flores said. “The lock had to be slick, aesthetically pleasing to the eye, but effective and provide security to the owner. With the help of a mentor of mine and a machine shop, I knew through work everything else was history.”


They may look small, but the locks pack a punch. “The locks are made of mild steel, while the key is high-strength heat treated steel,” Flores said. “It is all made in the USA at a local, family-run machine shop.”
For the time, the lock is only available for half-inch bolts, but there are plans to provide locks for light bars and 5/8-inch bolts.

Connecting It All With J.E. Reel
Without a driveshaft, the truck is not going anywhere. We reached out to Jim Reel at J.E. Reel to help figure out what the best driveshaft would be for our application.
The truck from the factory has a two-piece steel driveshaft. Some Colorado and Canyon owners have swapped the two-piece for a one-piece out of a Silverado, but that may not always be the best choice.

The larger diameter driveshafts found in the Silverado are aluminum and are prone to denting off-road. “The material for off-road driveshafts should be of high-quality 10/20 DOM tube,” Reel explained. “They should also use forged weld yokes and U-joints.”


There is also a science behind the two-piece. “A two-piece driveshaft is used in place of a single driveshaft when the length is too long,” Rell said. “The angle of driveshaft could also be too severe. The extra U-joints will allow the angle to be split up over more U-joints.”


We gave J.E. Reel measurements from the transmission to the carrier bearing and from the carrier bearing to the rear axle. In a matter of days, they were able to create our new lengthened driveshaft and get us rolling to the desert.
Taking It Out In The Dirt
When it comes to finishing up a project like this the first time in the dirt can be both a fun and scary experience. It is the first time that you get to make sure everything is working correctly.
We took the truck out to Ocotillo Wells in Southern California to put it through its paces and make sure everything handled correctly. The drive out to the desert went smooth with no issues, but we wanted to get the truck dirty!

Hitting the dirt first time could not have felt any more perfect. The truck finally had a working front and rear long travel suspension, which made the ride incredibly different than from the factory.
We had the truck in many types of terrain to see how it could do and there was nothing it could not handle. We went through soft sand and hard-packed dirt. The soft sand seemed like it would have been the hardest, but the Truetrac in the rearend would engage like it was supposed to and push us through the sand.
Up next for the truck is finishing up the fuel cell, starting the cage, and planning out a powerplant swap. For the time being, we are going to be out enjoying the build and the SoCal desert season.

You might also like
2027 Nissan Frontier Sport Edition: The Sweet Spot For Weekend Warriors
The 2027 Nissan Frontier Sport Edition blends off-road capability, rugged styling, and V6 power into a midsize truck built for adventure.

