
n the spring of 2024, we published an update on “Operation Daihatsu Deck Van,” explaining that the kei truck had just undergone its first major transformation. While the DIY mods that had been made to the truck the year prior had made the obtuse machine significantly more practical, the delivery van-based chassis still sat entirely too low, and didn’t have squat for traction with stock rubber and 12-inch steelies.
So like any sensible aftermarket enthusiast, we set to throwing some lift springs, larger alloy wheels, and some more purpose-built tire compounds at the build, along with some security options for safely snugging down a full-sized spare. Then, for the better part of the next year I drove the ever loving hell out of that little runt of a farm truck, putting the Daihatsu through its paces in the mountains of rural southern Japan. Hauling firewood, moving stone, transporting deer carcasses down to the butchering table… all of the things the average, modern day mountain man does on his property was completed with the help of his trusty little Daihatsu 4×4.

Yet, even then, the need for more mods became painfully apparent. Unlike the modern generation, this older version of the Daihatsu Deck Van did not come with a limited slip rear differential from the factory, so getting stuck while mucking about in the mud remained a constant concern. Then, when I did get stuck, I didn’t have a way to get myself unstuck, so the need for a winch was painfully clear. So, one afternoon, I set to creating a “Stage 2” build list for my trusty little Daihatsu Deck Van, with the classic combo of winch, rear locker, and a brush guard being the primary focus. This was followed by the addition of better off-road lighting, some superior storage solutions, and a few fun DIY additions.
But before delving into the purpose-built components that would make Stage 2 of “Operation Daihatsu Deck Van” possible, I should probably provide some long-term feedback on the products our partners sent to make Stage 1 of the build a success. For it is only until a component sees a few months of use and abuse that one can truly gauge the merit of a product, which in this case, was doled out in sizable amounts on a near-daily basis.
Yokohama Tires Geolander X-AT Rubber FTW!


Since this pipsqueak of a pickup serves double-duty as both a farm truck and a daily driver, the need for a quality all-terrain tire was obvious from the get-go. Enter the Geolander X-AT from Yokohama Tires. A swiss army knife of tire compounds that is still made in Japan and features M+S (mud & snow) rating, dual sidewall and multi-ply reinforcement, and HD-2 puncture resistance ratings. The all-terrain design also features unique elliptical contact patches for prolonged lifespan and a quieter ride when on the blacktop, with broad center and shoulder tread blocks producing superior grip when off-road.
Weds Alloy Wheels Rule


Since we needed to safely lift the truck as much as possible while still meeting Japanese inspection code, a set of 14×4.5-inch WedsSport- Mud Vance 06 alloy rollers were selected for wrapping our Yokohama rubber around. Sporting a classic 10-spoke flush design, trapezoidal accents for easy cleaning and reduced weight, and a matte black finish for a stealthy look, Weds continue to be a solid option for those looking for an affordable set of forged rollers. Like our Yokohama AT tires, these wheels are still being made in Japan, and are held to the highest standards.
Forest Auto Factory Lift Springs Still Standing Tall


Sticking with the whole “Made in Japan” theme, comes the other half of the lift kit that made Stage 1 possible: Forest Auto Factory (FAF) lift springs. Unlike most kei trucks, the Daihatsu Deck Van rides atop coils on all four corners, and with an additional 35mm (about 1.4 inches) of suspension lift added to the tire and wheel equation, the truck now rides a full 2 inches higher than stock.
BOLT Lock Securely Keeps It All In Place

While theft definitely is not nearly as much of a concern over here in the mountains of Japan, it does still occasionally occur, which is precisely why BOLT Lock was tapped for the Deck Van’s security solutions. This primarily applies to the roof carrier-mounted full-sized spare, which is held in place with one of the Cable Locks from BOLT Lock. Impervious to the elements, the 1/4-inch diameter coil is the perfect size for sliding though the bolt holes on a spare and securing it to the vehicle.

For those who don’t know, BOLT stands for “Breakthrough One Lock Technology.” Essentially, this design allows you to program all of the locks you ever need with a single key. In this case, I used an ignition key, thus eliminating the need for a bunch of different keys for the spare tire cable lock, overland cooler, and accessory gear pad lock on the shipping container where I keep all my farm tools.
Daihatsu Deck Van Build Stage 2: Size Constraints, Weight Concerns & A Ton of Creativity

Now that we’ve covered the products that made Stage 1 such a success, it’s time to turn toward Stage 2 of the build, which was challenging to say the least. Not only did every step of the process offer one challenge after another, but the act of fitting everything onto a chassis with limited real estate from the factory was a genuine issue. Clearance concerns weren’t the only consideration either, as weight had to also be factored into the equation.
Since this is a kei truck, it weighs just barely over a ton (2,000 pounds) and has a 3-cylinder engine that at one point produced 53 hp and 39 lb-ft of torque. So yes, keeping things as lightweight as possible was a core consideration from the get-go, which ultimately led us to the following aftermarket off-road products.
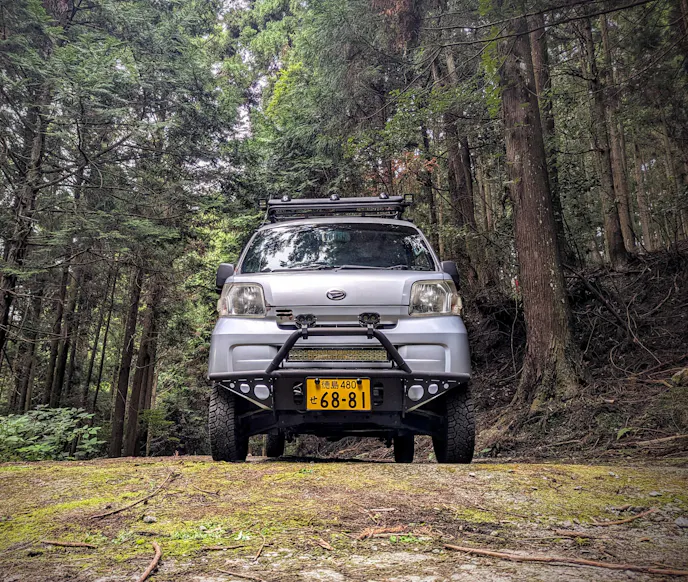
OVERTECH Bolt-In Brush Guard
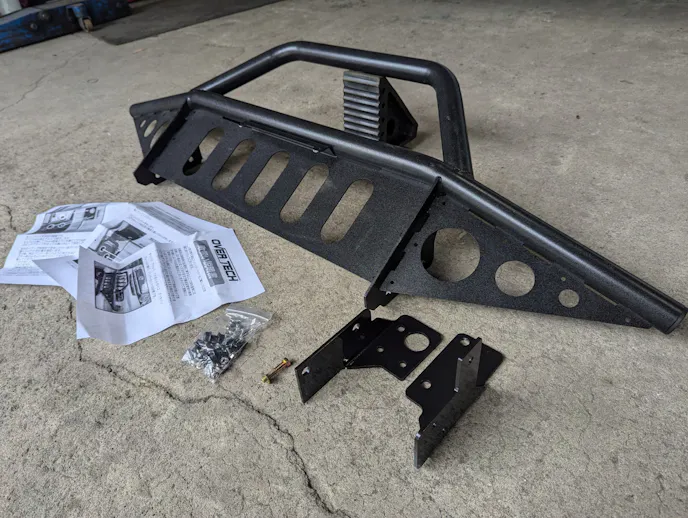
Before going gung-ho, and adding a winch and lighting up front, some form of protection had to be put into place. Not only was the dinky temporary LED foglight bracket I had been using wobbly as hell when attached to the Deck Van’s plastic bumper, but it didn’t offer crap for security when forging my way off-road. Since this is a relatively obscure chassis, brush guard options seemed limited, until I stumbled upon OVERTECH.
While the Japanese manufacturer does not offer much else for Daihatsu Deck Van owners, it does make a solid bolt-in brush guard for this older generation, with OVERTECH’s Type 1 Brush Guard being the most rugged. Each unit comes with everything needed for an install, including hardware, and features triangulated bash plates on each side, as well as a centrally-mounted skid plate, a license plate mounting point, and even a top-mount fog light bracket.


Installation was fairly straightforward, requiring the removal and modification of the front bumper and the discarding of a pointless piece of metal serving as a core support. From there, it was on to mounting brackets and chopping up the bumper so that we could have enough clearance for both the brush guard and the winch that was to be installed down the line. With the brush guard mounted, we carved out the flimsy lower corners of the front bumper for better approach and breakover, and turned toward the next task, a winch.

Anvil Off-Road UTV Winch
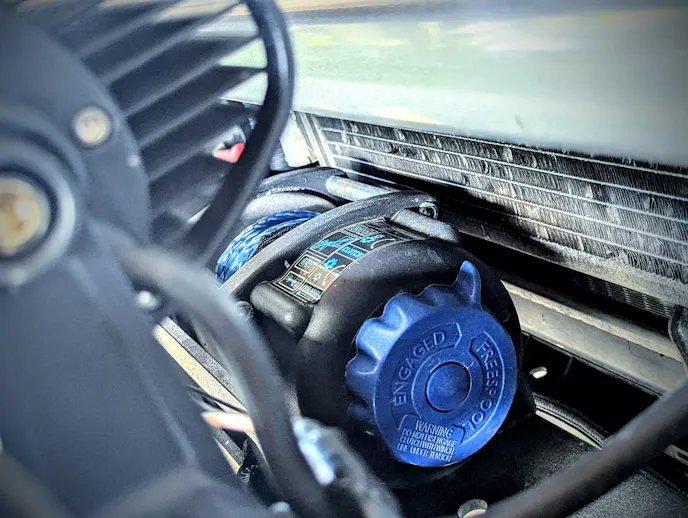
Since weight and space concerns were a top priority, Holley decided to lend a hand with the build by sending us one of its Anvil Off-Road 4,500-pound UTV winch kits. Complete with an aluminum fairlead and a 32-foot synthetic rope, this 1.6 hp 12-volt permanent magnet motor unit was just what this little pickup truck needed. Not only is it lightweight at just 25.3 pounds, but it also has a super low profile, which was important considering that it was going to be mounted behind the brush guard.


But while the winch did clear the condenser and the backside of the brush guard, finding a place to securely mount it posed a massive problem. The winch mounting plate Holley sent us was a massive hunk of a thing. Not only was it entirely too large and heavy, but there was no way to mount the damn thing. So, we made a cardboard template, chopped the plate up into pieces, drilled some holes, and welded up a custom unit constructed from the corners and center of the mounting plate.


Then, when it came time to mount the winch, we welded the reverse mounted corners of the bracket to the brush guard’s mounts and added some oversized bolts so that everything could be taken apart piece-by-piece as necessary. We also shaved out some of the fins in the center of the OVERTECH skid plate so that the winch could be fed directly through, and lined all of the edges with heavy-duty automotive door jam guards to prevent rope fraying. Hood pin quick releases were then added to the license plate mount so it could get easily popped off with the push of a button when the winch was needed and then easily reattached afterwards.
Traction Concepts Rear Diff Lock
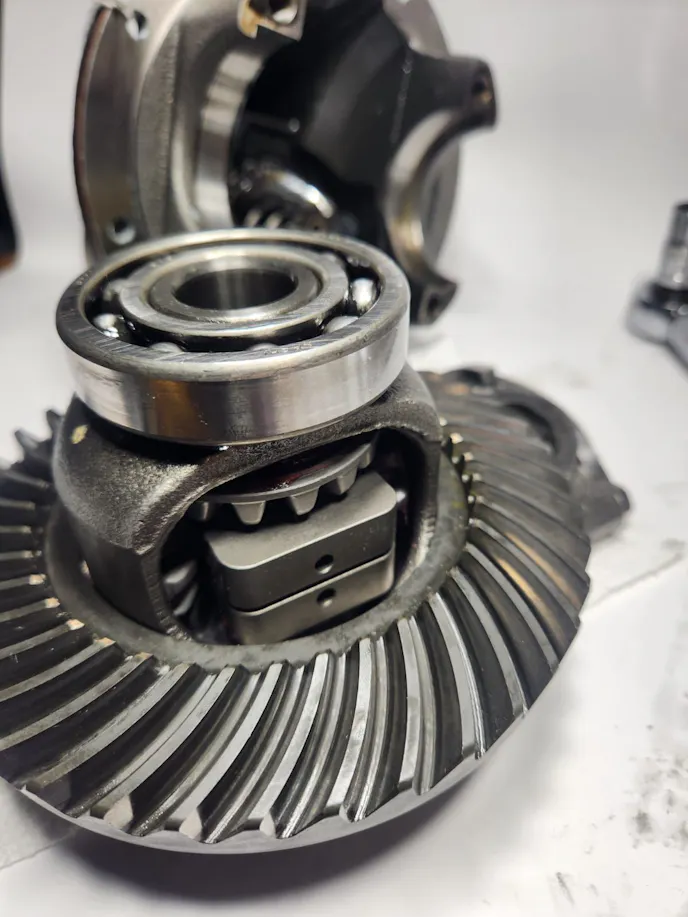
With the need for a locking rear differential being apparent since day one, I searched high and low for a reputable manufacturer that could offer an aftermarket solution. Eventually, I came across Florida-based Traction Concepts, which low and behold had been making one-off diff locks for kei trucks in America. So, with an upcoming trip to the USA already in the books I sourced a donor rear end on Yahoo Auction, removed the core differential from its housing, and boarded a plane with the hunk of steel stowed in a checked bag.
Flip forward a few months, and the locking differential was successfully installed in the stock Daihatsu rear end, and wheel slip out back was no longer an issue. I cannot stress enough the ease of the install with these lockers from Traction Concepts. They truly are the ultimate plug-and-play locker solution.


Just mail off your rear diff in its OE bell housing, and Traction Concepts will mail you back a fully refurbished rear end, complete with one of their clever diff locks inside. No shims are needed, any form of differential fluid works, and installation is as simple as bolting the unit back into place. It’s the ultimate quick fix for vehicles in need of a locking differential, and damn affordable to boot.
Naturally, since all of the instructions for the reassembly of the differential were in Japanese, Traction Concepts applied a light torque on the bolts, and instructed us to torque everything to OE Daihatsu spec in the shop prior to install.
Bright Earth Overland Lighting


With the brush guard, winch, and diff lock installed, it was now time to add those overland lights the build so desperately needed. While I did retain the dual spotters from Stage 1, they were moved to the top of the brush guard ‘s bull bar, allowing room for the Bright Earth LED light bar from Holley to be installed in the recessed space underneath.


Out back, a set of flood lights from Bright Earth were also installed, with a duo of spotlights making their way onto each front corner of the carrier rack. This allows additional lighting up front during dodgy night excursions and inclement weather, and a sweeping span of light over the deck for when it is time to unload gear at the campsite at night, or for when I have to hack up a wild hog at dusk.
A Few Finishing Touches


Finishing out Stage 2 of the build were a few DIY necessities, along with a handful of additional add-ons. Holley sent us a gasoline jerry can, but we had no way to install it in the deck area of the truck. So I procured a UTV rack from Kolpin, and installed it out back, creating a two-tier mounting system that could hold the gas can, but also accommodate the spare tire, camping gear, and anything else I didn’t want sitting in that filthy-ass truck bed.

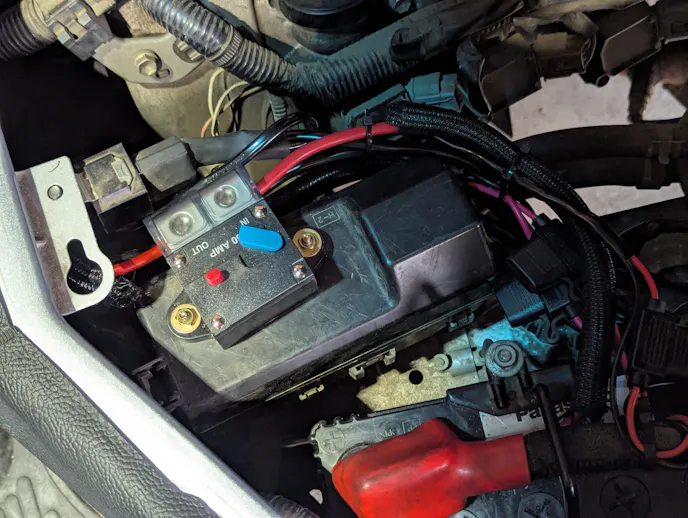
And while all of the lighting Holley sent over did come with switches, I didn’t fancy the thought of a bunch of round button rockers spread across the cab. So I built a custom doghouse and installed a marine rocker panel toggle system, which provides voltage readouts and gives me access to additional USB ports, as well as the real estate for more lighting down the line if needed. This control box also provides a mounting point for the winch switch, and after attaching some modified molle siding to the doghouse, I was able to move my dropbags and molle pouches to the front of the cab for easy access to daily use items, like a cigar cutter and a torch lighter.
From there, it was on to throwing an amber truck cab kit on the roof carrier and applying some rust paint on the outside for that signature farm truck look, which mind you is still a work in progress and is slated for a second layer in a dark military pigment here this autumn. There’s also a one-off steel rear bumper bar on the way, custom LED headlights and some basic power adder bolt-ons on the way, but we’ll just have to wait and see how those modifications play out.
In the meantime, I’m going to get back to work on the mountain, knowing full well that I now have a tiny Daihatsu pickup truck that is far safer, practical, and off-road-ready than ever before. Who knows? Maybe I’ll head out to Japan’s longest public off-road trail this weekend. It technically does start in my backyard…
You might also like
A Towboat Captain Turned This $400 Jeep Liberty Into A Four-Linked Rock Crawler On 40s
This incredible 2005 Jeep Liberty was built from a $400 Facebook Marketplace find. Features include Super Duty axles and a custom four-link.

