
Editor’s Note: Guest article by Mike Ingalsbee
One thing that is synonymous with OBS (Old Body Style) Fords is their weak and noisy power steering pumps. To make matters worse, they all seem to leak as well. I had a noisy pump on Autonomous 4×4, so I set out to solve the problem.
I set out to build out the entire steering system to give it better strength and performance. I completed a whole host of upgrades to the steering and proceeded to put several hundreds of miles on the truck without issue.

Digging In To Find The Issue
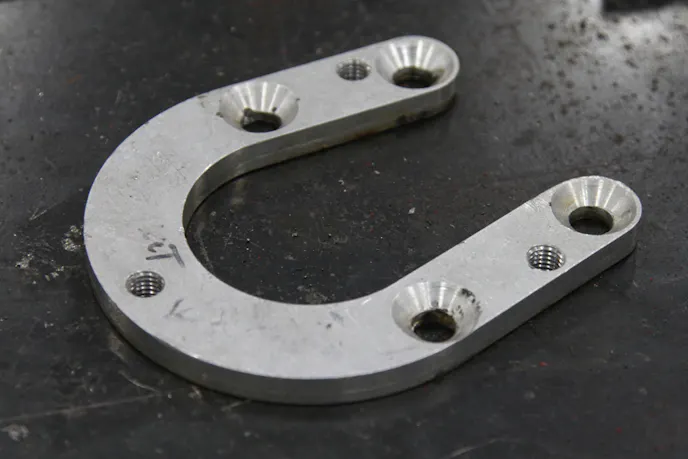
Just when I thought I was finished, a new product from Barnes 4WD caught my attention. They now have offset heim joints for steering applications. The factory tie rods and ends were replaced with fabricated linkage using chromoly tubing and heim joints, all for increased strength.


The problem with a straight tube going in front of the axle is that it comes very close to the front differential cover. So close that it actually limits your turning radius because the linkage will make contact with the cover at full lock.


The offset heim joints from Barnes 4WD give you the clearance you need to clear the cover and gain the steering angle lost. On a long wheelbase vehicle such as mine, you need as much steering angle as you can get.
Starting at the beginning of my steering project, the factory Ford power steering pump was squealing horribly. Years of leaking fluid had the front end of the truck soaked with fluid and covered in sludge. I had purchased the vehicle used, and the previous owner had been simply refilling the leaking reservoir instead of making repairs.

If you plan on doing this same upgrade, you will avoid a lot of grief if you thoroughly clean the gunk off the front end before starting the project. I used degreaser and a hose, but so much was caked onto the front end that it would have been much better to have it steam cleaned before starting. There were several times during the conversion when I had to spend additional time cleaning the frame and components on the front of the truck; it was a mess.
A popular conversion on Jeeps for decades, the Saginaw steering pump is a much quieter and more durable option than the factory Ford pump. With that said, Saginaw pumps did come from the factory on many Ford trucks. Heavy duty vans, cab & chassis, and ambulance models have all been offered with Saginaw pumps. If you can find the factory accessory mount for your particular engine, it’s a direct bolt-on. Sources would be a dealership with new old stock (NOS) parts or an auto dismantler.


Our engine is the gas-powered 460. The only Ford vehicles we could find near the shop with Saginaw pumps were diesel-powered and the dealerships had been picked clean of NOS brackets years ago. Your area might be different; it’s worth a quick look to save you the trouble of modifying the factory bracket. I got my pump from the local Napa Auto Parts store. It was for the same year (1992) E350 Ford van.
If you are going to modify your factory bracket like I did, your first step is to make careful measurements from the pump mounting surface of your bracket to your belt pulley. You want to make sure that your belt will line up perfectly with the rest of your accessories when you are done.
Side loading your belt causes premature wear on the belt and the pulleys in your system. Mine measured .567 inches which I wrote directly on the bracket so the vital measurement would not be lost. You will have to remove material from the bracket in order for the Saginaw pump’s reservoir to clear. Use your choice of available tools – I used an air grinder with an abrasive cut-off wheel.
Make sure to leave a generous radius in the corner so it does not create a stress riser and crack. Once the bracket has enough clearance for the reservoir, you will need to drill new holes for the Saginaw’s bolt pattern.
I ordered an adapter bracket from PSC Motorsports that had both the factory and Saginaw bolt patterns to make it easy to mount, but the bracket was for a 351 engine. It was too thick to work with the 460, as the pulley would not locate in the correct position. However, it did make a good template for locating new holes in the bracket.
Once the holes were located, I fabricated a 3/16-inch thick spacer that located the pump at the correct distance to match the .567-inch pulley distance I measured previously. Actually, I made two matching plates; one that went on the back side as a spacer, the other one I used on the front side to sandwich the factory aluminum bracket with steel for added support. Make sure you have enough room so the bolts head clear the pulley.

Looking Past The Pump
With the pump addressed, I was just getting started. I am running 37X12.5R17 Falken Wildpeak tires on Trailready beadlock wheels. The substantial weight and contact patch of the tires would put a big load on the new pump, so plans were made to include hydraulic ram assist to the system.
The steering box would need additional ports to provide pressurized fluid to the ram. I sent the Ford steering box to Power Steering Solution (PSS), where they rebuilt it and added the ports in the housing that were needed. PSS also built a two-inch diameter ram with the necessary travel I needed to cycle the steering linkage.

Many people mount their steering ram onto the axle housing so the force is applied directly to the steering linkage. I wanted to keep the ram and the fluid lines up out of harm’s way so I came up with a different configuration. My ram is bolted to the front of the factory crossmember with a fabricated bracket. The shaft runs to a specially constructed, dropped pitman arm. This design reduces unsprung weight and keeps the ram and fluid lines away from rocks and sand. The downside is that it can put a side load on the sector shaft in the steering box.
To protect against this, I also fabricated an assembly that supports the end of the sector shaft, holding it in double shear. A bracket that bolted to the front cross member included an adjustable heim joint.


A pair of the correct size nuts were welded together, taking care to make sure they were accurately aligned. The double nut was tightened onto the sector shaft to attach the dropped pitman arm. A bolt wass then slid through the heim joint support and tightened into the other end of the double nut.


Care was taken to make sure that the ram was located parallel to the steering linkage. It is also important that the ram bottoms out on its own internal stops. You don’t want the hydraulic assist pushing against the hard stops on the steering knuckles, as it might bend or break the steering linkage.
I fabricated the custom mounting brackets myself, but when it came to critical components like the custom pitman arm and steering linkage, I sent the components out to Jason Lafortune Race Cars to be professionally TIG welded. The fabricated pitman arm uses the splined end of a forged pitman arm and laser-cut quarter-inch thick steel plate. The linkage is constructed from 1.5-inch, .120-wall chromoly tubing with welded tube bungs on each end.


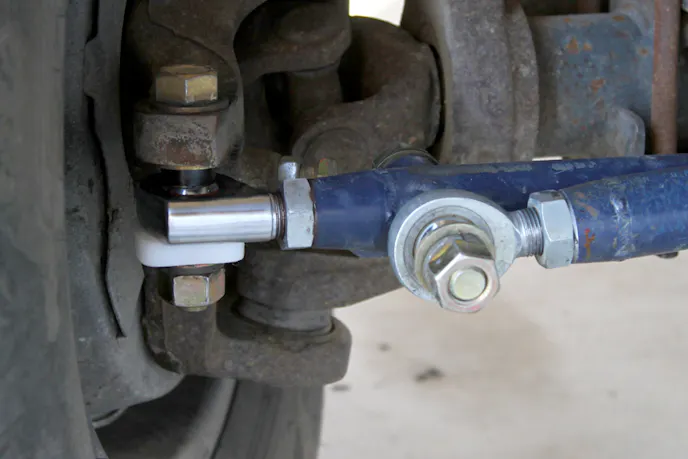
Heim joints articulate on spherical bearings so they can flop up and down when used in horizontally. In order to keep them flat, I fabricated spacers from a solid block of Delrin. I pressed steel tubing into the bores so that they could be tightened to the necessary torque without crushing the Delrin. They held the linkage parallel without grinding against the heim joints.

With the hard parts taken care of, it came time for the lifeblood of the system – the fluid. The factory system uses a coil of tubing that is attached to the front crossmember. I was using that real estate to mount the ram, so a remote cooler was plumbed into the system. The cooler is an extruded aluminum, heat sink style that is mounted to the front suspension crossmember by more fabricated brackets.


The extruded style filters were more durable than sandwiched plate-style coolers, and the mount also incorporated a rock shield for protection. The mount was designed to be rotated up or down to create more or less air flow across the cooling fins.

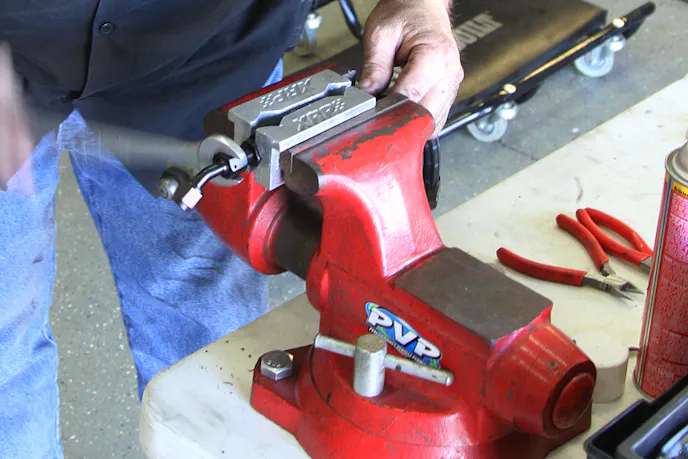
The system was plumbed with aircraft hose and fittings by Lance Barron at Performance Vehicle Plumbing. Lance prefers to work on race vehicles, but did this job as a personal favor. Like the TIG welding, I wanted the plumbing done by a professional. I didn’t scrimp on the fluid either; Maxima synthetic power steering fluid was used for its superior performance under increased loads and elevated temperatures.
With all of these upgrades to my steering system and full motion restored with the offset heim joints, I look forward to trouble-free operation in the demanding conditions I regularly see covering off-road racing events.

You don’t have to go as highly modified as I did, but if your steering pump is making a racket, stop the whining and go with a Saginaw pump conversion on your Ford.
You might also like
We Drove AEV's First-Ever 2026 Ford FXL: Here's What Surprised Us
We drive the 2026 AEV Ford FXL and see how AEV transforms the Ford Super Duty with 40-inch tires and serious off-road capability.

